Spring之——基于注解的IOC配置、IOC练习、Spring整合Junit
常用注解
- 基于注解整合时,导入约束时需要多导入一个 context 名称空间下的约束。
1
2
3
4
5
6
7
8
9
<beans xmlns="http://www.springframework.org/schema/beans"
xmlns:context="http://www.springframework.org/schema/context"
xmlns:xsi="http://www.w3.org/2001/XMLSchema-instance"
xsi:schemaLocation="http://www.springframework.org/schema/beans
http://www.springframework.org/schema/beans/spring-beans.xsd
http://www.springframework.org/schema/context
http://www.springframework.org/schema/context/spring-context.xsd"> - 如果xml和注解一起使用,则在xml配置文件中需要告知Spring创建容器时需要扫描的包
1
2
<!-- 告知 spring 创建容器时要扫描的包 -->
<context:component-scan base-package="com.itheima"></context:component-scan>
用于创建对象的
@Component
相当于:
1 | <bean id="" class=""> |
- 作用:把资源让 spring 来管理。相当于在 xml 中配置一个 bean。
- 属性:value:指定 bean 的 id。如果不指定 value 属性,默认 bean 的 id 是当前类的类名。首字母小写。
它衍生了三个注解,他们的作用及属性都是一模一样的,其实就是@Component子类,他们只不过是提供了更加明确的语义化
- @Controller:一般用于表现层的注解
- @Service:一般用于业务层的注解
- @Repository:一般用于持久层的注解
用于注入数据的
相当于:
1 | <property name="" ref=""> |
- @Autowired
- 作用:自动按照类型注入。当使用注解注入属性时,set 方法可以省略。它只能注入其他 bean 类型。当有多个类型匹配时,使用要注入的对象变量名称作为 bean 的 id,在 spring 容器查找,找到了也可以注入成功。找不到就报错。
- @Qualifier
- 作用:在自动按照类型注入的基础之上,再按照 Bean 的 id 注入。它在给字段注入时不能独立使用,必须和@Autowire 一起使用;但是给方法参数注入时,可以独立使用。
- 属性:
- value:指定 bean 的 id。
- @Resource
- 作用:直接按照 Bean 的 id 注入。它也只能注入其他 bean 类型。
- 属性:
- name:指定 bean 的 id。
- @Value
- 作用:注入基本数据类型和 String 类型数据的
- 属性:
- value:用于指定值
用于改变作用范围的
相当于:
1 | <bean id="" class="" scope=""> |
- @Scope
- 作用:指定 bean 的作用范围。
- 属性:
- value:指定范围的值。
- singleton
- prototype
- request
- session
- globalsession
- value:指定范围的值。
和生命周期相关的
相当于:
1 | <bean id="" class="" init-method="" destroy-method="" /> |
- @PostConstruct
- 作用:用于指定初始化方法。
- @PreDestroy
- 作用:用于指定销毁方法
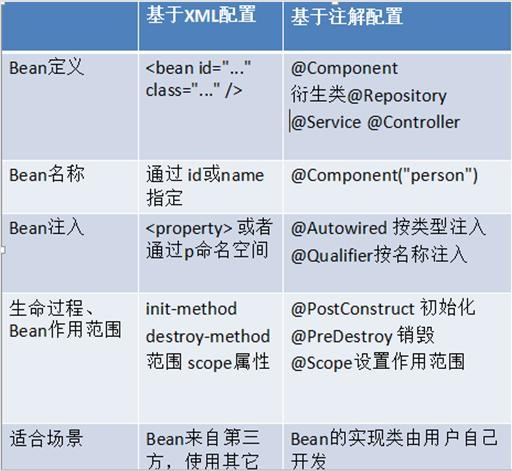
关于 Spring 注解和 XML 的选择问题
- 注解的优势:配置简单,维护方便(我们找到类,就相当于找到了对应的配置)。
- XML 的优势:修改时,不用改源码。不涉及重新编译和部署。
- Spring管理bean的方式比较
练习(整合spring与Mybatis)
基于纯xml配置文件
数据库创建
1
2
3
4
5
6
7
8
9
10
11
12
13
14
15
16
17
18
19
20
21
22
23
24
25
26
27
28
29
30
31
32
33
34
35
36
37
38
39
40
41
42
43
44
45
46
47
48
49
50
51
52
53
54
55
56
57
58
59
60
61
62
63
64
65
66
67
68DROP TABLE IF EXISTS `user`;
CREATE TABLE `user` (
`id` int(11) NOT NULL auto_increment,
`username` varchar(32) NOT NULL COMMENT '用户名称',
`birthday` datetime default NULL COMMENT '生日',
`sex` char(1) default NULL COMMENT '性别',
`address` varchar(256) default NULL COMMENT '地址',
PRIMARY KEY (`id`)
) ENGINE=InnoDB DEFAULT CHARSET=utf8;
insert into `user`(`id`,`username`,`birthday`,`sex`,`address`) values (41,'老王','2018-02-27 17:47:08','男','北京'),(42,'小二王','2018-03-02 15:09:37','女','北京金燕龙'),(43,'小二王','2018-03-04 11:34:34','女','北京金燕龙'),(45,'啊啊啊','2018-03-04 12:04:06','男','北京金燕龙'),(46,'老王','2018-03-07 17:37:26','男','北京'),(48,'小马宝莉','2018-03-08 11:44:00','女','北京修正');
DROP TABLE IF EXISTS `account`;
CREATE TABLE `account` (
`ID` int(11) NOT NULL COMMENT '编号',
`UID` int(11) default NULL COMMENT '用户编号',
`MONEY` double default NULL COMMENT '金额',
PRIMARY KEY (`ID`),
KEY `FK_Reference_8` (`UID`),
CONSTRAINT `FK_Reference_8` FOREIGN KEY (`UID`) REFERENCES `user` (`id`)
) ENGINE=InnoDB DEFAULT CHARSET=utf8;
insert into `account`(`ID`,`UID`,`MONEY`) values (1,46,1000),(2,45,1000),(3,46,2000);
DROP TABLE IF EXISTS `role`;
CREATE TABLE `role` (
`ID` int(11) NOT NULL COMMENT '编号',
`ROLE_NAME` varchar(30) default NULL COMMENT '角色名称',
`ROLE_DESC` varchar(60) default NULL COMMENT '角色描述',
PRIMARY KEY (`ID`)
) ENGINE=InnoDB DEFAULT CHARSET=utf8;
insert into `role`(`ID`,`ROLE_NAME`,`ROLE_DESC`) values (1,'院长','管理整个学院'),(2,'总裁','管理整个公司'),(3,'校长','管理整个学校');
DROP TABLE IF EXISTS `user_role`;
CREATE TABLE `user_role` (
`UID` int(11) NOT NULL COMMENT '用户编号',
`RID` int(11) NOT NULL COMMENT '角色编号',
PRIMARY KEY (`UID`,`RID`),
KEY `FK_Reference_10` (`RID`),
CONSTRAINT `FK_Reference_10` FOREIGN KEY (`RID`) REFERENCES `role` (`ID`),
CONSTRAINT `FK_Reference_9` FOREIGN KEY (`UID`) REFERENCES `user` (`id`)
) ENGINE=InnoDB DEFAULT CHARSET=utf8;
insert into `user_role`(`UID`,`RID`) values (41,1),(45,1),(41,2);Mybatis主配置文件:SqlMapConfig.xml
1
2
3
4
5
6
7
8
9
10
11
12
13
14
15
16
17
18
19
20
21
22
23
24
25
26
27
28
29
30
31
32
33
<configuration>
<properties resource="jdbcConfig.properties"></properties>
<typeAliases>
<package name="priv.liuhaoan.domain"/>
</typeAliases>
<environments default="mysql">
<environment id="mysql">
<transactionManager type="JDBC"></transactionManager>
<dataSource type="POOLED">
<property name="driver" value="${driver}"/>
<property name="url" value="${url}"/>
<property name="username" value="${username}"/>
<property name="password" value="${password}"/>
</dataSource>
</environment>
</environments>
<mappers>
<package name="priv.liuhaoan.dao"/>
</mappers>
</configuration>Mybatis使用的jdbc配置文件(数据库配置):
1
2
3
4driver=com.mysql.jdbc.Driver
url=jdbc:mysql://localhost:3306/test
username=root
password=Mybatis使用的每个持久称类的映射配置文件:UserDao.xml
1
2
3
4
5
6
7
8
9
10
<mapper namespace="priv.liuhaoan.dao.UserDao">
<select id="findAll" resultType="user">
select * from user
</select>
</mapper>Spring使用的配置文件:bean.xml
1
2
3
4
5
6
7
8
9
10
11
12
13
14
15
16
17
18
19
20
21
22
23
24
25
26
27
28
29
<beans xmlns="http://www.springframework.org/schema/beans"
xmlns:xsi="http://www.w3.org/2001/XMLSchema-instance"
xsi:schemaLocation="http://www.springframework.org/schema/beans
http://www.springframework.org/schema/beans/spring-beans.xsd">
<!-- Mybatis初始化 -->
<bean id="resourcesAsStreamMybatis" class="org.apache.ibatis.io.Resources" factory-method="getResourceAsStream">
<constructor-arg name="resource" value="SqlMapConfig.xml"></constructor-arg>
</bean>
<bean id="sqlSessionFactoryBuilder" class="org.apache.ibatis.session.SqlSessionFactoryBuilder"/>
<bean id="sqlSessionFactory" factory-bean="sqlSessionFactoryBuilder" factory-method="build">
<constructor-arg name="inputStream" ref="resourcesAsStreamMybatis"/>
</bean>
<!-- 需要提交事务等功能时,如果全部用同一个对象,那么可能出现数据安全问题,所以这里采用多例的 -->
<bean id="sqlSession" factory-bean="sqlSessionFactory" factory-method="openSession" scope="prototype"/>
<!-- Dao对象 -->
<bean id="userDao" factory-bean="sqlSession" factory-method="getMapper">
<constructor-arg type="java.lang.Class" value="priv.liuhaoan.dao.UserDao"/>
</bean>
<!-- service对象 -->
<bean id="userService" class="priv.liuhaoan.service.impl.UserServiceImpl">
<property name="session" ref="sqlSession" />
<property name="userDao" ref="userDao" />
</bean>
</beans>持久层接口:UserDao
1
2
3
4
5
6
7
8
9
10
11
12
13
14
15
16
17
18
package priv.liuhaoan.dao;
import priv.liuhaoan.domain.User;
import java.util.List;
/**
* user表持久层操作类
*/
public interface UserDao {
/**
* 查询所有用户
* @return
*/
List<User> findAll();
}可重用组件(JavaBean对象):User
1
2
3
4
5
6
7
8
9
10
11
12
13
14
15
16
17
18
19
20
21
22
23
24
25
26
27
28
29
30
31
32
33
34
35
36
37
38
39
40
41
42
43
44
45
46
47
48
49
50
51
52
53
54
55
56
57
58
59
60
61
62
63
package priv.liuhaoan.domain;
import java.io.Serializable;
public class User implements Serializable {
private Integer id;
private String username;
private Integer birthday;
private String sex;
private String address;
public String toString() {
return "User{" +
"id=" + id +
", username='" + username + '\'' +
", birthday=" + birthday +
", sex=" + sex +
", address='" + address + '\'' +
'}';
}
public Integer getId() {
return id;
}
public void setId(Integer id) {
this.id = id;
}
public String getUsername() {
return username;
}
public void setUsername(String username) {
this.username = username;
}
public Integer getBirthday() {
return birthday;
}
public void setBirthday(Integer birthday) {
this.birthday = birthday;
}
public String getSex() {
return sex;
}
public void setSex(String sex) {
this.sex = sex;
}
public String getAddress() {
return address;
}
public void setAddress(String address) {
this.address = address;
}
}业务层接口:UserService
1
2
3
4
5
6
7
8
9
10
11
12
13
14
15
16
17
18
19
20
21
22
23
24
25
26
27
28
package priv.liuhaoan.service.impl;
import org.apache.ibatis.session.SqlSession;
import priv.liuhaoan.dao.UserDao;
import priv.liuhaoan.domain.User;
import priv.liuhaoan.service.UserService;
import java.util.List;
public class UserServiceImpl implements UserService {
private SqlSession session;
private UserDao userDao;
public void setSession(SqlSession session) {
this.session = session;
}
public void setUserDao(UserDao userDao) {
this.userDao = userDao;
}
public List<User> findAll() {
System.out.println("Service执行了");
return userDao.findAll();
}
}业务层接口实现类:UserServiceImpl
1
2
3
4
5
6
7
8
9
10
11
12
13
14
15
16
17
18
19
20
21
22
package priv.liuhaoan.service.impl;
import priv.liuhaoan.dao.UserDao;
import priv.liuhaoan.domain.User;
import priv.liuhaoan.service.UserService;
import java.util.List;
public class UserServiceImpl implements UserService {
private UserDao userDao;
public void setUserDao(UserDao userDao) {
this.userDao = userDao;
}
public List<User> findAll() {
System.out.println("Service执行了");
return userDao.findAll();
}
}测试代码
1
2
3
ClassPathXmlApplicationContext classPathXmlApplicationContext = new ClassPathXmlApplicationContext("bean.xml");
UserService userDao = classPathXmlApplicationContext.getBean("userService", UserService.class);
userDao.findAll().forEach(System.out::println);测试结果
1
2
3
4
5
6
7
Service执行了
User{id=41, username='老王', birthday=2018, sex=男, address='北京'}
User{id=42, username='小二王', birthday=2018, sex=女, address='北京金燕龙'}
User{id=43, username='小二王', birthday=2018, sex=女, address='北京金燕龙'}
User{id=45, username='啊啊啊', birthday=2018, sex=男, address='北京金燕龙'}
User{id=46, username='老王', birthday=2018, sex=男, address='北京'}
User{id=48, username='小马宝莉', birthday=2018, sex=女, address='北京修正'}
基于半xml半注解(最佳方案)
ps:在上面练习的基础上修改
- Spring使用的bean.xml配置文件
1
2
3
4
5
6
7
8
9
10
11
12
13
14
15
16
17
18
19
20
21
22
23
24
25
26
27
28
29
30
31
32
33
34
35
36
37
<beans xmlns="http://www.springframework.org/schema/beans"
xmlns:context="http://www.springframework.org/schema/context"
xmlns:xsi="http://www.w3.org/2001/XMLSchema-instance"
xsi:schemaLocation="http://www.springframework.org/schema/beans
http://www.springframework.org/schema/beans/spring-beans.xsd
http://www.springframework.org/schema/context
http://www.springframework.org/schema/context/spring-context.xsd">
<!-- 告知Spring创建容器时扫描包 -->
<context:component-scan base-package="priv.liuhaoan"></context:component-scan>
<!-- Mybatis初始化 -->
<bean id="resourcesAsStreamMybatis" class="org.apache.ibatis.io.Resources" factory-method="getResourceAsStream">
<constructor-arg name="resource" value="SqlMapConfig.xml"></constructor-arg>
</bean>
<bean id="sqlSessionFactoryBuilder" class="org.apache.ibatis.session.SqlSessionFactoryBuilder"/>
<bean id="sqlSessionFactory" factory-bean="sqlSessionFactoryBuilder" factory-method="build">
<constructor-arg name="inputStream" ref="resourcesAsStreamMybatis"/>
</bean>
<!-- 需要提交事务等功能时,如果全部用同一个对象,那么可能出现数据安全问题,所以这里采用多例的 -->
<bean id="sqlSession" factory-bean="sqlSessionFactory" factory-method="openSession" scope="prototype"/>
<!-- Dao对象 -->
<bean id="userDao" factory-bean="sqlSession" factory-method="getMapper">
<constructor-arg type="java.lang.Class" value="priv.liuhaoan.dao.UserDao"/>
</bean>
<!-- service对象(这里改用注解配置了) -->
<!--<bean id="userService" class="priv.liuhaoan.service.impl.UserServiceImpl">
<property name="session" ref="sqlSession" />
<property name="userDao" ref="userDao" />
</bean>-->
</beans> - 业务层UserService对象
1
2
3
4
5
6
7
8
9
10
11
12
13
14
15
16
17
18
19
20
21
22
23
24
25
26
27
28
29
30
31
32
33
34
35
36
37
38
39
40
package priv.liuhaoan.service.impl;
import org.apache.ibatis.session.SqlSession;
import org.springframework.beans.factory.annotation.Autowired;
import org.springframework.beans.factory.annotation.Qualifier;
import org.springframework.stereotype.Service;
import priv.liuhaoan.dao.UserDao;
import priv.liuhaoan.domain.User;
import priv.liuhaoan.service.UserService;
import java.util.List;
public class UserServiceImpl implements UserService {
private SqlSession session;
private UserDao userDao;
public UserServiceImpl() {
System.out.println("service创建了");
}
/*public void setSession(SqlSession session) {
this.session = session;
}
public void setUserDao(UserDao userDao) {
this.userDao = userDao;
}*/
public List<User> findAll() {
System.out.println("Service执行了");
return userDao.findAll();
}
}
Spring的纯注解配置
ps:我们选择哪种配置的原则是简化开发和配置方便,而非追求某种技术
@Configuration
- 作用:
用于指定当前类是一个 spring 配置类,当创建容器时会从该类上加载注解。获取容器时需要使用AnnotationApplicationContext(有@Configuration 注解的类.class)。
- 属性:
- value:用于指定配置类的字节码、
- 示例代码:
1
2
3
4
5
6
/**
* spring 的配置类,相当于 bean.xml 文件
*/
@Configuration
public class SpringConfiguration {
} - 注意:我们已经把配置文件用类来代替了,但是如何配置创建容器时要扫描的包呢?
请看下一个注解。
@ComponentScan
- 作用:
用于指定 spring 在初始化容器时要扫描的包。作用和在 spring 的 xml 配置文件中的:
<context:component-scan base-package="com.itheima"/>是一样的。 - 属性:
- basePackages:用于指定要扫描的包。和该注解中的 value 属性作用一样。
- 示例代码:
1
2
3
4
5
6
7
/**
* spring 的配置类,相当于 bean.xml 文件
*/
@Configuration
@ComponentScan("com.itheima")
public class SpringConfiguration {
} - 注意:我们已经配置好了要扫描的包,但是数据源和 JdbcTemplate 对象如何从配置文件中移除呢?
请看下一个注解。
@Bean
- 作用:
该注解只能写在方法上,表明使用此方法创建一个对象,并且放入 spring 容器。
- 属性:
- name:给当前@Bean 注解方法创建的对象指定一个名称(即 bean 的 id)。
- 示例代码:
1
2
3
4
5
6
7
8
9
10
11
12
13
14
15
16
17
18
19
20
21
22
23
24
25
26
27
28
29
30
31
32
33
34
/**
* 连接数据库的配置类
*/
public class JdbcConfig {
/**
* 创建一个数据源,并存入 spring 容器中
* @return
*/
@Bean(name="dataSource")
public DataSource createDataSource() {
try {
ComboPooledDataSource ds = new ComboPooledDataSource();
ds.setUser("root");
ds.setPassword("1234");
ds.setDriverClass("com.mysql.jdbc.Driver");
ds.setJdbcUrl("jdbc:mysql:///spring_day02");
return ds;
} catch (Exception e) {
throw new RuntimeException(e);
}
}
/**
* 创建一个 DBAssit,并且也存入 spring 容器中
* @param dataSource
* @return
*/
@Bean(name="dbAssit")
public DBAssit createDBAssit(DataSource dataSource) {
return new DBAssit(dataSource);
}
} - 注意:
我们已经把数据源和 DBAssit 从配置文件中移除了,此时可以删除 bean.xml 了。
但是由于没有了配置文件,创建数据源的配置又都写死在类中了。如何把它们配置出来呢?
请看下一个注解。
@PropertySource
- 作用:用于加载.properties 文件中的配置。例如我们配置数据源时,可以把连接数据库的信息写到properties 配置文件中,就可以使用此注解指定 properties 配置文件的位置。
- 属性:
- value[]:用于指定 properties 文件位置。如果是在类路径下,需要写上 classpath:
- 示例代码:
- 配置:
1
2
3
4
5
6
7
8
9
10
11
12
13
14
15
16
17
18
19
20
21
22
23
24
25
26
27
28
29
30
31
32
33
34
35
36
37
38
/**
* 连接数据库的配置类
*/
public class JdbcConfig {
private String driver;
private String url;
private String username;
private String password;
/**
* 创建一个数据源,并存入 spring 容器中
* @return
*/
public DataSource createDataSource() {
try {
ComboPooledDataSource ds = new ComboPooledDataSource();
ds.setDriverClass(driver);
ds.setJdbcUrl(url);
ds.setUser(username);
ds.setPassword(password);
return ds;
} catch (Exception e) {
throw new RuntimeException(e);
}
}
} - jdbc.properties 文件:
1
2
3
4jdbc.driver=com.mysql.jdbc.Driver
jdbc.url=jdbc:mysql://localhost:3306/day44_ee247_spring
jdbc.username=root
jdbc.password=1234
- 配置:
- 注意:
此时我们已经有了两个配置类,但是他们还没有关系。如何建立他们的关系呢?
请看下一个注解。
@Import
- 作用:
用于导入其他配置类,在引入其他配置类时,可以不用再写@Configuration 注解。当然,写上也没问题。
- 属性:
- value[]:用于指定其他配置类的字节码。
- 示例代码:
1
2
3
4
5
6
7
8
9
10
11
@Configuration
@ComponentScan(basePackages = "com.itheima.spring")
@Import({ JdbcConfig.class})
public class SpringConfiguration {
}
@Configuration
@PropertySource("classpath:jdbc.properties")
public class JdbcConfig{
} - 注意:我们已经把要配置的都配置好了,但是新的问题产生了,由于没有配置文件了,如何获取容器呢?
通过注解获取容器
1 | ApplicationContext ac = new AnnotationConfigApplicationContext(SpringConfiguration.class); |
Spring整合Junit
在测试类中,每个测试方法都有以下两行代码:
ApplicationContext ac = new ClassPathXmlApplicationContext("bean.xml");IAccountService as = ac.getBean("accountService",IAccountService.class);
这两行代码的作用是获取容器,如果不写的话,直接会提示空指针异常。所以又不能轻易删掉。
针对上述问题,我们需要的是程序能自动帮我们创建容器。一旦程序能自动为我们创建 spring 容器,我们就无须手动创建了,问题也就解决了。
我们都知道,junit 单元测试的原理(在 web 阶段课程中讲过),但显然,junit 是无法实现的,因为它自己都无法知晓我们是否使用了 spring 框架,更不用说帮我们创建 spring 容器了。不过好在,junit 给我们暴露了一个注解,可以让我们替换掉它的运行器。这时,我们需要依靠 spring 框架,因为它提供了一个运行器,可以读取配置文件(或注解)来创建容器。我们只需要告诉它配置文件在哪就行了。
实现步骤
1、导入maven坐标
1 | <dependency> |
2、测试类代码
1 | /** |
- @RunWith:替换原有运行器(junit其实就是集成了一个main方法),SpringJUnit4ClassRunner为junit中runner的子类
- @ContextConfiguration:指定 spring 配置文件的位置
- locations 属性:用于指定配置文件的位置。如果是类路径下,需要用 classpath:表明
- classes 属性:用于指定注解的类。当不使用 xml 配置时,需要用此属性指定注解类的位置。
- @Autowired:给测试类中的变量注入数据